null
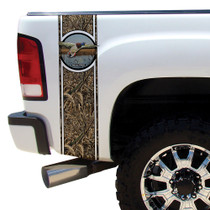
WHITETAIL BED BAND- REALTREE XTRA CAMO

WHITETAIL BED BAND- REALTREE XTRA CAMO

(No reviews yet) Write a Review
$39.99
SKU:
BBRTWTXT
Details:
  • Adhesive vinyl graphic
  • Air Release technology for easy, bubble-free installation
  • Designed to fit most full-size and compact trucks and SUVs
  • Manufacturer's 3 year warranty
Sizing:
  • 2 Bed Bands Per Order - 10" x 40" Each
  • This product is made to fit between the wheel well and the bumper on the Rear Quarter Panels of Vehicle. Fits all Trucks, trimming required for SUV & Jeeps.
Note:
Actual colors may vary from the color on your screen due to monitor color restrictions.
Whitetail Bed Band with Realtree® Xtra Camo. This easy-to-use kit is designed to fit the quarter panel of most full size trucks. Kit includes: (2) 8" x 40" bed bands. Matte finish.
NecessaryTools:
  • Mild Soap & Water Mixture or Alcohol - to clean the surface.
  • Lint Free Paper Towel or Cloth – to dry the surface.
  • Low-Tack Masking Tape – to tack in place or create a hinge.
  • Squeegee or Credit Card – for applying vinyl
  • Air Release Tool – to remove any trapped air bubbles that may form.
  • Hobby Knife (OFLA or XACTO knife) – for trimming away excess vinyl.
  • Heat Gun – for heating vinyl on complicated installations.
Before Graphic Installation:
  • The first step in any successful application is cleaning your Camowraps® Project before Installation.
  • For any Vehicle Accent, the day before application, the vehicle should be taken to a car wash that uses brushes. Manual cleaning is not recommended.
  • After the vehicle is washed, thoroughly inspect the surface and edges for any remaining wax, polish, grease or grime.
  • Any such substance must be removed using industrial cleaners or silicone detergents (Isopropyl Alcohol will not do the trick). Using two cloths (one dry, one with Solvent) one in each hand, wipe the solvent on with the wet towel and then off with the dry one. This is to keep the solvent from drying onto the surface. CAUTION: Before Using any Solvent on a vehicle, be sure to test in an inconspicuous area to ensure the solvent won’t damage the vehicle’s paint.
  • A final cleaning should be done with Isopropyl Alcohol to clean away any impurities that could hinder the adhesive using the same two hand, two cloth method as mentioned above.
  • The next step is to remove any parts that may hamper the application such as Trims & Logos. Check and clean the covered surfaces as described above.
  • It is very important to allow the vehicle to dry completely. It can take up to 24 hours for a vehicle to dry fully, when in humid or cold conditions, which may mean allowing the vehicle to dry indoors overnight before applying.
Recommended Installation Conditions:

Whenever possible, try to apply graphics indoors in a controlled environment, such as a covered car bay or garage. Doing so will not only help you control the temperature (ideally between 70°F and 80°F), but also reduce the amount of wind, dust and other contaminates that may hinder the install process. Make sure your bay or garage is as clean as possible from dust or debris that may happen to circulate during your install (mop floor and dust with a damp cloth) before bringing in the surface for the vinyl application.

If you must do your install outside, grab a friend and choose a non-windy day that is between 60°F and 90°F, with a surface temperature over 45°F (use water to cool surface) to insure the adhesive bond forms correctly.

How to Install your Bed Band:

IMPORTANT: DO NOT STRETCH THE MATERIAL TOO FAR WHILE INSTALLING. THIS WILL CAUSE THE PRODUCT TO CURL AND LIFT FROM THE CORNER PANEL AFTER IT IS INSTALLED. AVOID USING HIGH PRESSURE WASHING OR BRUSHES AROUND BED BAND AREA AS IT CAN CAUSE DAMAGE OR REMOVE THE PRODUCT.

  1. Clean & Dry Application Area with a Mild Soap & Water Mixture and Dry Completely with Lint Free Cloths.
  2. Position Bed Band in desired location and secure with low-tack masking tape on corners & edges to hold into place while you create a horizontal hinge in the center with the Masking Tape.
  3. Gently fold top half of the material down and peel away the release liner exposing the adhesive. Carefully Trim off the release liner with a sharp knife or razor blade.
  4. Unfold the Bed Band allowing the center to touch the surface while holding the rest of the material above the surface.
  5. Using a squeegee or credit card to Apply the exposed Bed Band Material to the surface by using soft horizontal strokes, evenly side to side, working from the center outwards.
  6. Once the first half is applied, Gently fold bottom half of the material up and peel away the release liner exposing the adhesive. Unfold the Bed Band allowing the center to touch the surface while holding the rest of the material above the surface.
  7. Using a squeegee or credit card to Apply the exposed Bed Band Material to the surface by using soft horizontal strokes, evenly side to side, working from the center outwards. Trim overhang areas on the top and bottom of Bed Band with a Sharp Razor Blade, being extra careful not to scratch the vehicles finish.
  8. Bed Bands have a clear masking on top, carefully remove from front of Bed Band after install. After Masking is removed, re-squeegee the entire Bed Band to make sure you have proper adhesion. If large bubbles form, stick with sharp pin and re-squeegee the area. Small bubbles will diffuse thru material in a few days depending on the ambient temperature.
Camouflage Care Tips:

Use soap and water to clean graphics. Do Not use a pressure washer on graphics as this can cause them to rip and peel away. Do Not use petroleum based cleaners or spill gas on graphics as this can cause them to fade or change color completely. Do Not wax the graphics; it will only cause damage to them.

How to Remove:

In order to remove the Bed Band you may have to Heat the Bed Band with a Heat Gun or Hair Dryer for several seconds to loosen the adhesive bond. Continue to heat as you peel the material from the surface on a 120 Degree Downward Angle. Any residue that may be left behind can be removed with a Citrus Based Remover or Alcohol. 

Write a Review
This product hasn't received any reviews yet. Be the first to review this product!

Returns Policy

Camowraps is committed to providing quality products that are sure to surpass expectations. However, if you are unsatisfied with your purchase, you can exchange or return your undamaged, uninstalled graphic within 90 days of delivery. After 30 days of delivery, products will be subject to a restocking fee.

To obtain your refund/exchange, please contact our customer service department at 1-866-226-6626. Return items should be in their original packaging, include all packing materials and receipt. 

Defected or Damaged Product Returns:

If you received an item containing defects, please contact customer service at 1-866-226-6626.


Shipping

We can ship to virtually any address in the world. Note that there are restrictions on some products, and some products cannot be shipped to international destinations.

When you place an order, we will estimate shipping and delivery dates for you based on the availability of your items and the shipping options you choose. Depending on the shipping provider you choose, shipping date estimates may appear on the shipping quotes page.

Related Products

Realtree Camo Prym1 Veil Camo Muddy Girl Natural Gear Camo Game Guard Camo
Subscribe to our newsletter